This blog is a lab notebook for my work with the Reprap open source 3D printing undertaking.
Thursday, August 19, 2010
Chasing bugs in Slice and Dice
I had completed my narrow profile telepresence finger and then set about designing a mount for the gearmotor and potentiometer to drive it. The mount came out looking a bit weird.
Trust me, though, there were good reasons why it took the shape that it did ... in my twisted mind, at least.
The first thing I discovered was that my print roads routine is not extremely happy with sharp ended print roads like you see here.
Fortunately, I was able to pull the few unique slice images into Windows Paint and clean them up rather handily in just a few moment. Slice and Dice is very good about giving you ways around problems you encounter with difficult parts. The messy print roads were only the beginning of my troubles, however. When I tried to turn the image into an XML description of the roads all hell broke out. My pathfinder routine, which worked well enough for most slices, really hated this gearmotor mount.
I finally gritted my teeth and spent the time chasing up the many bugs in the pathfinder routine. Once that process, which took about two man-days, was complete, I was able to get a pretty good XML conversion.
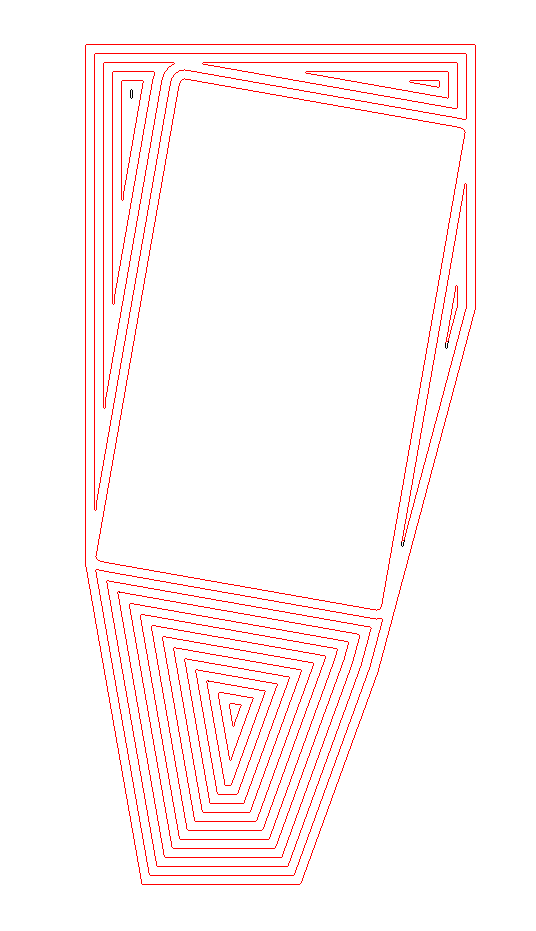
Red overlays indicates well formed print roads. The black residue shows where the routine failed.
You can see the failures circled in blue. Looking a bit closer at a few of the failures you can see that the routine breaks down when the distance between two parts of a print road drops below 0.2 mm. That's a ridiculous case, but slice and dice routines regularly encounter ridiculous cases. Here is a typical one.
Here you can see that the pathfinder routine jumped the 0.1 mm gap between two sections of the path. Another thing that became obvious is that the routine can't handle paths which are less than 1 mm in their greatest dimension.
None of these faults are serious enough to cause me to continue working on the code at the moment. I'm back to printing.
Saturday, August 14, 2010
Peeling parts off of the raft
I am rather far along in the finger design for the telepresence hand. Now that I have flexible sensors and a need to modify the design to accommodate them, I decided to take the time to reduce the width of the finger design to something approximating my own finger. This entailed reducing its width by 25%.
Doing that was a simple matter of rescaling the STLs in Art of Illusion for the narrower width. Once done, however, the phalanges were so small that using the belt sander to take off the raft was something that was no longer practical.
Heretofore, I have simply printed the raft and part all at 240 C and used the belt sander to take off the raft after printing. With the more delicate narrow finger phalanges, however, I could not hold the parts in my fingers safely and had to use pliers to hold them for the sanding. Unfortunately, getting even removal of the raft by that method was a sometime thing.
After a few goes with the delicate phalanges, I decided that it was time to upgrade the Slice and Dice code to vary temperature by layers in order to make the part separable from the raft.
I use a rather traditional raft with heavy, widely spaced print roads for the first layer to even out any misalignment of the print table and flaws in the print table. I print this at a print speed of F240 and an extrusion rate of S360. For the next and last layer of the raft I quadruple the print speed to F960 whilst keeping the extrusion rate the same. All of this is done at a print temperature of 240 C.
What I decided to do for a removable raft was to keep the first layer as it was and then add a third layer to the raft. The second and third raft layers were to be printed at a lower temperature and then the print itself done at 240 C as before.
I did a series of prints lowering the temperature of raft layers 2 and 3. The sweet spot seems to be at about 215 C. At temperatures higher than that adhesion between raft layer 1 with 2 is too high and adhesion between layers 2 and 3 and the print object is too high as well. I could not get reliable extrusion of ABS at temperatures lower than 215.
The new print protocol produced a raft and print which were reasonably easy to separate with one's fingers as you can see here.
the bits of layers 2 and 3 sticking to the printed part are easily removable with either the belt sander or a piece of conventional sandpaper in just a few moments.
Sunday, August 08, 2010
Finishing the reel
I discovered that while the mismatch of inner and outer loops can be sorted out on a single slice fairly easily, things get tougher when you have successive slices getting smaller as I do with the 45 degree angled slopes on the servo reel.
What I did was to make two halves of the reel with boolean operations like this...
Slice and Dice lets me control the print roads on each slice, so I simply arranged it so that inner and outer loops did not meet on one side...
...and left off loops on the other side to make the reel into two halves that fitted together.
So, it was effectively back to glued together plastic model airplane dodges again.
Saturday, August 07, 2010
Improving print roads calculations
In which your narrator rewrites the Slice and Dice routine that calculates print roads on a slice.
Having got a working finger design for my telepresence hand project, last weekend I set about to rig it to a servo motor to see what issues would come up. One of the items needed was a reel which screws onto the servo which takes up the tendons on the finger and moves them in concert.
The 40 mm reel looks like this...
I wanted to make the reel solid since it will be under considerable torque. To achieve that I used my concentric print roads option rather than cross hatching. I am not fond of cross-hatching mostly because the join between the perimeter of a print and the cross-hatching is so often mechanically poor. Using concentric print roads yields a much stronger print.
I calculated concentric roads very simply by painting a strip of pixels on the boundary of the slice to create an interior print road, deleting the strip to define the print road and then painting another strip inside of the new, smaller boundary. I repeated that simple process until I ran out of slice.
Heretofore, I'd used concentric prints for relatively shallow prints like this phalange...
This looks pretty good. I had been quite happy with the concentric roads routine till I applied it to the spool. The spool was a deep object, 40 mm in diameter with an interior and exterior boundary. You can see what happened...
The roads track the original boundary quite nicely till you get 6-8 roads away from the boundary. Then, geometric features of the original boundary are sufficiently magnified that the roads bear little resemblance to the shape of original boundary. The reel provides a really nasty example of this kind of distortion.
The reel that resulted was actually very strong, but looked nasty. Last night, I undertook to see if there was another way to do the job.
After several false starts, I discovered that if I began with the original slice boundary in one picture box and then mapped a filled circle of the proper radius onto each pixel in the boundary I got extremely smooth print roads. The reel slice you were first shown looked like this with the new routine...
You will notice that the interior and exterior boundary roads match each other very well but show a gap between the interior and exterior roads. The hole in this slice of the reel is a screwdriver access port for securing the reel to the servo drive shaft. The dimension in this slice is just big enough to pass the screwdriver tip. I widened that access port by two millimeters and the problem with the roads mismatch disappears as you can see here...
The reel consists of two parts; the reel itself and an insert which is glued into a recess in the reel which seats over the servo drive shaft and allows for a screw to secure it. You can see how this works in this exploded view of the ensemble...
As designed the print road pattern for the reel slice defining the recess for the insert looks like this.
If you look closely you will notice that the meet between inner and outer roads is a bit tight. The outer dimension of the insert is not critical and can be adjusted a bit to even that out. Care must be taken, however, to not compromise the roads in the insert in the adjustment.
The more experience I get printing dimension critical parts the more I understand what a balancing act getting the proportions is. When you are printing a critical part you can't just slap it together in CAD, pump out an STL and print it. The print road cross section is an integral part of your design and you have to exercise considerable cunning in making everything work together. This experience is much like what I learned after I graduated from architectural design studios eons ago. It's easy to design something that looks nice if you have any sense of aesthetics at all. Designing something that looks {or works} nice that can actually be built is a far harder task.
In any case, I've got the new print road mapping routine running rather well and am going back to work on my telepresence hand project.
Wednesday, August 04, 2010
Applying VTEC to Slice and Dice
In which your narrator lowers the execution time of Slice and Dice by upwards 90%.
Now that I am well into designing the hand for my telepresence project, I am running into the limits on the processing speed of Slice and Dice in the design cycle. In the past, I could run the code through a good wash and brush up and reduce the execution time by 90%. That would take about a man-week that I don't want to spend. Instead, I chose to take advantage of a characteristic of the parts I design to achieve faster execution speeds.
Typically, I have been designing parts that look somewhat like this.
When you look at it closely, you notice that there are really only two different cross sections through the vertical axis.
Now Slice and Dice as I wrote it is not particularly bright code. I wrote it to be simple, not efficient. When you slice this object into 0.25 mm wafers you get 39 slices that look something like this.
Slice and Dice tediously processes each slice as if it were unique. I took a day off to see if I could take advantage of the geometric repetitiveness of my parts. To do that I initially thought to simply match each image with succeeding image and throw out the duplicates.
Life wasn't quite that simple. While the slices looked identical, miniscule differences in the way the slicing routine interacted with triangles showed up in the flooded pictures seen above. I did find, however, that if I allowed flaws in the pixels of up to 0.2% of the total in the flooded images the 39 images were reduced to exactly 2...
Which is what you would have expected if the slicing had been geometrically perfect. Thus I had to do cpu intensive processing on two slices instead of 39. That saved about 94% of the processing time that I had previously been using and got my processing speed into the range I was used to seeing with Skeinforge.
As an added advantage, the reduction routine picks up broken slices very nicely.
This approach would not, I think, work with a programme like Skeinforge or, unless I misunderstand how it works, Netfabb. It could, however, easily be applied to Adrian's host code for Reprap.
Sunday, August 01, 2010
Printing in trays
Ordinarily, I like to print parts one at a time while I am design them. The telepresence finger, however, has reached a rather advanced state, so I've written a small script to shuffle two print files together so that they can be simultaneously printed.
The travel time between prints gives them a chance to cool and lets me print much smaller isolated features like the post circled in red successfully than would otherwise be possible.
Wednesday, July 28, 2010
Some thoughts and observations about having a Reprap machine in the design cycle
In which your narrator reflects on the rather radical difference between what he perceived the design process would be pre and post the advent of practical Reprap printers.
Do you want to read more?
From 2005 till November of last year, I spent most of my free time trying to build a Reprap printer. It was good fun and I learned a lot of things. Mostly, I learned how not to be intimidated by technology that I was not familiar with. For me, this was an extremely valuable lesson.
When my day job began to require more and more of my attention towards the middle of last year, my development of Tommelise 2.0, my own repstrap project began to suffer. Finally, at the end of October I sat down and did an unpleasant assessment of my situation. I could continue to work on Tommelise, or I could simply buy one of the Reprap-derived kits that were beginning to emerge from small enterprises started up by other core team members. I estimated that it would take something like another 6-8 months to get Tommelise 2.0 printing properly. I subsequently ordered one of Ian Adkins' Rapman 3 printers.
Rapman 3 is a re-engineered clone of the first generation Darwin design. I bought it rather than the somewhat cheaper Makerbot primarily because it had a substantial print volume but also because an associate, Batist Leman, had been blogging his experience with the model. Batist was very impressed with the Rapman and communicated that very well through his video clips of it in operation.
Prior to November, I was designing and making parts with the object of making a Reprap machine. Afterwards, I was designing and making parts WITH a Reprap machine. The distinction can be easily lost on those who have not used a Reprap machine.
What I have discovered in the eight months since is that the availability of a Reprap machine makes a massive change in one's design practices.
Prior to November I lusted after a professional 3D CAD package. Features like dimensioning and reliable boolean operations cluttered my thinking. The problem was that I was thinking like an engineer, viz, I wanted to make careful designs in 3D and then have print them out on an accurate 3D printer. I no longer feel that way.
With the advent of Art of Illusion (AoI) 2.8.1, I stopped lusting after "professional" CAD packages even though by that time I already owned several. My design cycle now looks like this.
- (re)design (a) part(s)
- print the part(s)
- manually and visually see how the parts work together
- repeat the process until satisfied
Precise dimensions became not very important while things fitting together properly did. The linkage between these two factors was not as strong as one might first suppose.
With a Reprap printer it became a simple matter to run through a dozen design cycles to get a parts ensemble to work in a matter that suited me. I currently design with the Reprap printer as part of the design cycle rather than using it as a final step after design cycles are finished.
At the beginning of this year Skeinforge, which I had been using previously, went through a rough spot. This encouraged me to invest in the upcoming Netfabb software prior to its release. As the Skeinforge rough patch continued and the folks at Netfabb's release dates began to slip, I finally became frustrated and then angry. I wasn't able to do the design work I wanted.
In frustration, I unearthed my old Slice and Dice code from the Tommelise project and began to bring it up to date. Having used both Skeinforge and the nascent Netfabb offering to process STL files into print instructions I evolved a very different approach to processing solids files than what either of these two products offered.
Both Skeinforge and Netfabb basically take your STL and give you print instructions. They do it very quickly and efficiently. Unfortunately, if you have a dodgy design file they can produce some very crazy print files. Ones ability to respond to crazy print files is, perforce, limited. With both Skeinforge and Netfabb, the majority of craziness is generated when ones STL files are flawed. The need for perfect STL files had fueled my previous lusting after "professional" 3D CAD packages.
I responded with Slice and Dice by internalising Mandelbrot's maxim that noise is always going to be there and it will be unpredictable. Instead of striving for perfection, Slice and Dice concentrated on giving me options to deal with imperfect design files. I began by keeping each slice of a design file as an image that I could bring into simple image handling tools like Windows Paint and manipulate. Paint let me patch and alter flawed slices to suit myself. I no longer needed a "professional" 3D CAD system. AoI was just fine for my purposes.
From there, I discovered that if you use 2-3 print roads to define a print's perimeter you wind up with a strong part even without infill. I began working to improve my control of perimeter print roads and soon found that I could make parts not unlike those in old fashioned plastic model airplane kits which used injection-moulded parts that you glued together. Infill became unnecessary in all but the most extreme cases. Hollow parts were tremendously quicker to print and not nearly so prone to warping. as "solid" parts. I don't use a heated bed and doubt that I will anytime soon.
Conventional Reprap thinking views a 3D printer as being able to print, more or less, any 3D object. Development has concentrated on infill and support materials to achieve these ends. Both are wasteful of printer time and materials, in my opinion. I try to design parts which keep in mind the strength and weaknesses of my printer.
As you can see with this telepresence 'bot finger, I think I am getting pretty good results.
Monday, July 26, 2010
Memories of plastic model airplanes
In which your narrator harks back to his youth and fingerprints ruined by trimming plastic flash off of model airplane parts with double edged razor blades.
I have an aversion to infills. Recently, I realised where the aversion came from. During the 1950s you could buy plastic model airplane kits for $1-2. These were made with injection moulded parts that came on little flat plastic Christmas trees. Exacto knives in that era were both expensive, for a child at least, and the blades dulled quickly and were largely beyond the ability of a child to resharpen. As a result, this child nicked paper-thin double edged razors from the medicine cabinet to trim the parts off of the tree and trim the flash off of the parts.
That worked fine, except for the cuts which the blades would make on ones fingertips which eventually grew into permanent scars. That was no big deal in those days.
Having trimmed your parts you glued them together with Testors or Duco cement {ethyl or butyl acetate} and, with a bit of paint, you had a lovely airplane to hang off of your ceiling by a thread and dream about flying.
Early on in the Reprap project, we used Solarbotics gearmotors. When you opened one of the gear boxes of, say, a GM-3 you found that the housing had been made using the same injection moulding process that model airplace manufacturers used. With a working Reprap printer I quickly began to loathe the clumsy, infilled parts that we were designing. They wasted both time {to print} and filament as well. Worse still, one tended to stick the parts together with expensive nuts and bolts.
Why not make parts that fit together like the old model airplanes?
The trick there is that the old model airplanes inevitably had a left side and a right side or a top a bottom that were often simply mirror images of each other. This weekend I was design a finger tip with left and right sides. I had designed the left side and got it working acceptably and was going back to do the right side in Art of Illusion {AoI} when it occurred to me that it would be much simpler to just write a script to swap the sign of the coordinates of the axis that I wanted to mirror around. Writing that script took about five minutes and saved me a lot of time in redesign and reprocessing of the resultant STL since my script operated directly on the Gcode.
Printing the two halves was trivial.
It took a few moments to scrape off the raft and a few drops of cement to finish the part.
The result was an elegant looking part that would have been a right bastard to design and print conventionally.
While I've incorporated this simple mirroring script into my own Slice and Dice STL processing software it would be no big deal to incorporate it into the more widely used STL processing routines available to Reprappers either open source or commercial.
Sunday, July 18, 2010
First prints
Slice and Dice is pretty much working now. I'm not completely happy with how the infill and the perimeter prints hook up, but that's mostly parameter tuning. I'm debugging Slice and Dice while I am designing a robotic hand. Here is the distal phalange {finger tip} that I've done for a first try.
I've left out the infills in that they are not necessary. Here you can see the first print that I am happy with.
I've really got to break down and find a camera that can do better closeups for small objects. My periodontist uses one for photographing teeth, an Olympus, which might be the ticket. I may well buy one after my quarterly tax payment is done towards the end of this month.
As you can see in this second pic, there is a separation between the outer and inner print road for the flexural axis. I've got to reduce some the outer radius there or lower the extruder flowrate and go for three print roads instead of two on that part of the print.
Saturday, July 17, 2010
In production
Got the whole Slice and Dice ensemble running together last night and did some test prints. Vectorization cured up the extruder head slowdown completely for curved print roads. Sweet! :-D
Saturday, July 10, 2010
Operational again
I was able to put the final touches on the Slice and Dice upgrade last night. The app is operational again. Now I can get to work on that telepresence hand project. :-)
Tuesday, July 06, 2010
Vectorization of pixel defined print roads actually working properly
In which a very kind Adrian Bowyer takes pity on your narrator.
In my last posting on 21 June, I laid out a method for vectorizing a pixel-defined perimeter. Having read the posting, Adrian Bowyer, a published expert on this sort of thing, took me aside and showed me how to do the vectorization efficiently instead of just at all, the solution I came up with.
Using Adrian's approach, I was able to achieve my goal of getting exact vectorization of the print road and push out the average segment length to well over the 0.3+ mm that was required to assure a print head speed over the major axis of at least 16 mm/sec.
You can see an example of such a vectorization here. All values, save the last, are in tenths of a millimeter.
The last value in the listbox, "rho/axis" should allow me to adjust the print speed on the fly in G1 statements to assure a constant head velocity for print road segments greater than 0.3 mm in length.
I should be printing ABS parts again by this weekend, which is good since I want to redesign and print one of these.
Monday, June 21, 2010
Vectorization of pixel defined print roads
In which your narrator describes the end, hopefully, of a search for a reasonable way of converting pixel-defined print roads calculated by Slice and Dice.
For the past two months I've struggled with what has been, for me, a very nasty problem, viz, converting pixel boundaries defining print roads for my Rapman printer into equivalent vector descriptions. As I mentioned previously, in order to get a major axis velocity of 16 mm/sec on the SD card Rapman 3.x you have to have GCode vectors of no less than 0.3 mm. If you are printing detail finer than that the lag caused by reading off the card and processing the GCode slows down the print head dramatically.
From my literature search, vectorization is a fraught process, especially if you are not willing to accept considerable degradation of your pixel-defined road. With 3D printing, perforce, we really can't accept degradation.
Over the last few weeks, I've finally confected a method which seems to do the job. As with most things I do, it is relatively simple and straightforward.
Suppose we have a perimeter path for an involute profile gear...
The method grabs a 2.1 mm patch {note the red circle} at the extreme left of the path which you can see here...
Here you can see the individual pixels making up the print road. The first thing we do is define the starting point and direction of the road from the centre of the patch.
At that point I pivot a scan from the center of the patch and identify the closest fits at ranges varying from 1 pixel to 11 pixels.
In this case, the longest perfect fit to the involute profile was 4 pixels.
Red pixels represent the fitted vector while blue indicate the remaining pixels. Notice that this vector is four pixels long, just enough for the Rapman to operate at 16 mm/sec.
The patch is then re-centred over the most distant red pixel and the process repeated until the full loop is vectorized.
Looking at a simpler problem, consider a hexagonal print road...
Isolating the beginning of the print road yields...
Scanning this straight line gets a perfect match at 11 pixels. Thus the way I have the code set up now creates vectors of up to 11 pixels in length, a maximum length of about 1.4 mm. It's reasonable to ask why the vectors are kept so short. In fact, it takes much longer to process the print roads with longer vectors and there is no reason, SD cards having huge storage capacity, not to have large print files.
As I get time in the coming weeks I will be fully embedding this method into Slice and Dice.
Sunday, June 13, 2010
New blog...
I've finally done enough work on my active telepresence project that I need a blog to document what I am doing. For anybody interested, you can access it here.
Sunday, May 09, 2010
Processing gcode instructions with the Rapman firmware
After running a variety of speed tests with the Rapman, I gained enough data to estimate the processing time for two kinds of gcode statement. The G1 statement processes in the Rapman 3.1 firmware at a rate of 17 msec/instruction. M108 instructions process at a rate of 19 msec/instruction.
Interestingly, the rate for the M108 instruction is actually significantly longer than for the G1. Given the floating point instructions necessary to interpret a G1 instruction this seems very odd. It would seem that much more time is spent reading off of the SD card than processing the information on a line of code. Either that or carrying out a M108 instruction in the Rapman firmware is more complicated that it would appear at first glance.
As a practical matter what this means is that if one wants to print a layer with 0.1 mm print road lengths you are looking at a maximum print speed of around 5.8 mm/sec. A print speed along a long road component axis of 16 mm/sec would imply that your average road segment would be no less than 0.3 mm.
Thursday, May 06, 2010
Further tests
I did a very careful, new series of speed tests using F960 (16 mm/sec) over a much longer diagonal baseline, viz, 1.7 meters, with the extruder running.
Here's what I found...
Step (mm) Seconds (s) Velocity (mm/sec)
0.1 214 5.77
0.2 110 15.40
0.3 121 14.14
0.4 80 21.21
0.5 80 21.21
Note that...
21.21 mm/sec ~ 16 mm/sec x 2^0.5
...which is about what you would expect for firmware that didn't correct for the angle of the print road.
As you can see, the break comes between gcode distances 0.3 and 0.4 mm and is quite abrupt. This means that the vectorization routine for Slice and Dice can be quite crude and work well with Rapman.
Here's what I found...
Step (mm) Seconds (s) Velocity (mm/sec)
0.1 214 5.77
0.2 110 15.40
0.3 121 14.14
0.4 80 21.21
0.5 80 21.21
Note that...
21.21 mm/sec ~ 16 mm/sec x 2^0.5
...which is about what you would expect for firmware that didn't correct for the angle of the print road.
As you can see, the break comes between gcode distances 0.3 and 0.4 mm and is quite abrupt. This means that the vectorization routine for Slice and Dice can be quite crude and work well with Rapman.
Wednesday, May 05, 2010
What does F960 really mean?
The vectorizer in Slice and Dice is pretty inefficient. With certain slopes and curved surfaces I'd noticed that the print head velocity could drop by as much as 25% down from 16 mm/sec to 12 mm/sec. I'd spent the last weeks working on improving my vectorizer when it occurred to me that I really didn't know how much improvement I needed to make on it.
To sort that out, I did a series of test runs where I moved the inactive print head from x = -75 mm to x = 75 mm using different steps with the nominal head speed set to 16 mm/sec (F960). Here are the very strange results that I got.
Step (mm) Seconds (s) Velocity (mm/sec)
0.1 25 6
0.5 5 30
1.0 3 50
10.0 2 75
150.0 2 75
As an example of the gcode I used...
G90
G21
M103
M105
M104 S0
G1 X-75.00 Y0.0 Z20.0 F960
G1 X-74.90 Y0.0 Z20.0 F960
G1 X-74.80 Y0.0 Z20.0 F960
....
G1 X74.70 Y0.0 Z20.0 F960
G1 X74.80 Y0.0 Z20.0 F960
G1 X74.90 Y0.0 Z20.0 F960
G1 X75.00 Y0.0 Z20.0 F960
M103
M104 S0
M103
I did further tests and discovered that unless the extruder is running the extruder head speed defaults to 75 mm/sec. When it is running F960 seems to be the speed of traverse of the longest dimension {xy} of the print road.
Specifically, I ran a 150 mm diagonal and discovered that F960 {16 mm/sec} clocks in at about 23 mm/sec. when you divide 23/2^.5 you get right at 16 mm/sec which means that the traverse speed for the x and y axes, which with a diagonal are equal, is 16 mm/sec.
BTW, I've started getting an SD Error2 report at the end of one of these test runs. I'm not at all sure what that is all about.
Monday, April 12, 2010
Bookkeeping and janitorial duties
There isn't much that is flashy to report at this time. A lot of my time in the past few days has been focussed on a telepresence 'bot project I have intended to design and build for years that the Rapman finally lets me design and print parts for. Oddly, though, getting the basic software modules that will control the 'bot all working together looks to be far harder than printing and building the 'bot itself. I guess that having worked on Reprap for five years now makes me a lot less intimidated by hardware tasks than previously.
Last week, I discovered that Slice and Dice's vectorization routine, which converts pixel defined boundaries to print areas into vectors usable in gcode, wasn't particularly nice. It was not reducing the boundary definitions nearly as much as it ought to have been. What that means as a practical matter is that it generates a lot more gcode than it ought describing very sort little print roads of a few tenths of a mm. Rapman is not designed to deal very efficiently with that kind of gcode and what happens is that the print speed drops well below the nominal rate set with the "F" specification. That not only wastes time but also puts more plastic on the print than it needs to have in areas where the perimeter curves. THAT makes for poor print quality.
I got to the bottom of that problem over the weekend.
As I set up for testing some new approaches to vectorization, I remembered that shifting from BMP to PNG reduced the disk requirements for a print project dramatically. I have plenty of disk space, but the reduction in disk requirements led me to redesign the files handling for Slice and Dice so that one can readily process and work with more than one print project at a time. That job holds no challenges as such, but is merely a bit of tedious restructuring files handling routines and testing to make sure that they all work. I've got that about two-thirds done.
Thus, slowly but surely Slice and Dice begins to look like very preliminary beta code.
Thursday, April 08, 2010
Collapsing the hard disk requirements of Slice and Dice
I managed this by the simple expedient, suggested by my son Adriaan, of replacing the BMP format slice image files with the Portable Network Graphics (PNG) format which uses a lossless data compression scheme. This reduced my slice image files in size from 16-22 Mbytes per slice to 80-100 Kbytes.
Saturday, April 03, 2010
Delta 'bot Axis
It's one thing to design and print plastic parts that have to mate with steel rods. As I am finding it is quite another to design plastic parts that have to mate with other printed plastic parts. During the last week in my spare time I proved out a design for a hexagonal column which I think might accommodate a herringbone rack and a sleeve seating a pinion gear, stepper motor and two guide plates.
Heretofore, I have been butt seating the column sections and then post-tensioning them. While that was okay for demonstrating the design approach, worries about creep said that I needed to have a male/female attachment technology so that I could fit sections of the column together and avoid having them do a lateral creep out of alignment. That proved to be considerably more difficult than I imagined.
This last weekend, I decided to take a different approach and instead of doing a conventional slice and dice of an STL, I decided instead to work with the print roads of my thin-walled column instead. What I did is a radial 45 degree overhang inside the column onto which I printed the male insert. I think it is worth mentioning how I achieved that.
The column was achieved for most of it's length with three concentric print roads of 0.6 mm width. What I needed to do was to build a ledge inside the column. When I began the ledge I widened the innermost print road to 0.8 mm. On the next layer I replaced the 0.8 print road with two 0.6 print roads. This process left me a 0.2 mm miniledge onto which the new innermost print road could adhere. I repeated this process until I had a ledge wide enough to print the male insert onto.
You can see the insert successfully executed here.
I would like to be able to say that that was all an easy exercise. It wasn't. I did exactly thirty text prints like the one you see before I was satisfied with the seating of the guide strips, herringbone rack and the male/female column connector system. I also had to chase several heretofore unsuspected bugs in Slice and Dice AND extend the coding somewhat. All the same, it's done and works so far.
At that point, I decided to see how tall a monolithic column section I could print. It appears that Rapman three can handle about 225 mm in the z-axis. I designed a 200 mm column with a 4 mm male connector and am printing it at present.
It is 2120 and I am up to about 50 mm. I'm doing a 0.25 mm layer every 45 seconds, so I expect to be finished at about 0500 tomorrow morning.
With such a large print I began to encounter xy and z faults. The xy faults were annoying, but the z faults tended to plunge the hot extruder head into the print. Upgrading the Rapman firmware to 2.0.8 got rid of the z faults but the xy faults remained.
I reduced the column test print to 55 mm, relocated the Rapman further away from my PC on a table by itself away from the cold window and switched ABS to HDPE because the acrid fumes were getting to be too much when I wasn't able to open the windows.
A thorough cleaning of the extruder with compressed air was also undertaken. After a few test prints I got the flow rate sorted out for HDPE and was able to successfully print a 55 mm column section in HDPE.
Subscribe to:
Posts (Atom)