Tuesday, May 31, 2011

Print table installed


I had gone to considerable trouble to make sure that I sited the bolt holes in the MDF {medium density fibreboard} print table properly. To that end I designed a template for each of the brackets that would show me where the guide holes should be put.


Once I had the table suitably aligned, I was able to drill the guide holes with my Dremel tool quite easily.


I then removed the table and took it to the workshop to drill out the holes to #8 bolt diameter.  When I returned and tried to mount the board I discovered that the holes didn't line up.  I had neglected to mark the lower left corner of the print table and had no way of knowing which side our orientation matched my drilled holes.  We are talking about a few mm here, mind.   There were 16 possible orientations and that was complicated by the fact that the brackets were able to rotate around the z-axis linear shafts in  the xy plane.  After about the tenth possible orientation, I found one that fit 3 of the four brackets and just redrilled both the MDF and the bracket.  Mercifully, solid ABS is very amenable to drilling so other than having the lower right corner showing an extra set of bolt holes, it all worked out quite well. 


Hopefully, I will remember to mark the lower left corner the next time I build one of these.  The print table moves quite freely as the video will demonstrate.


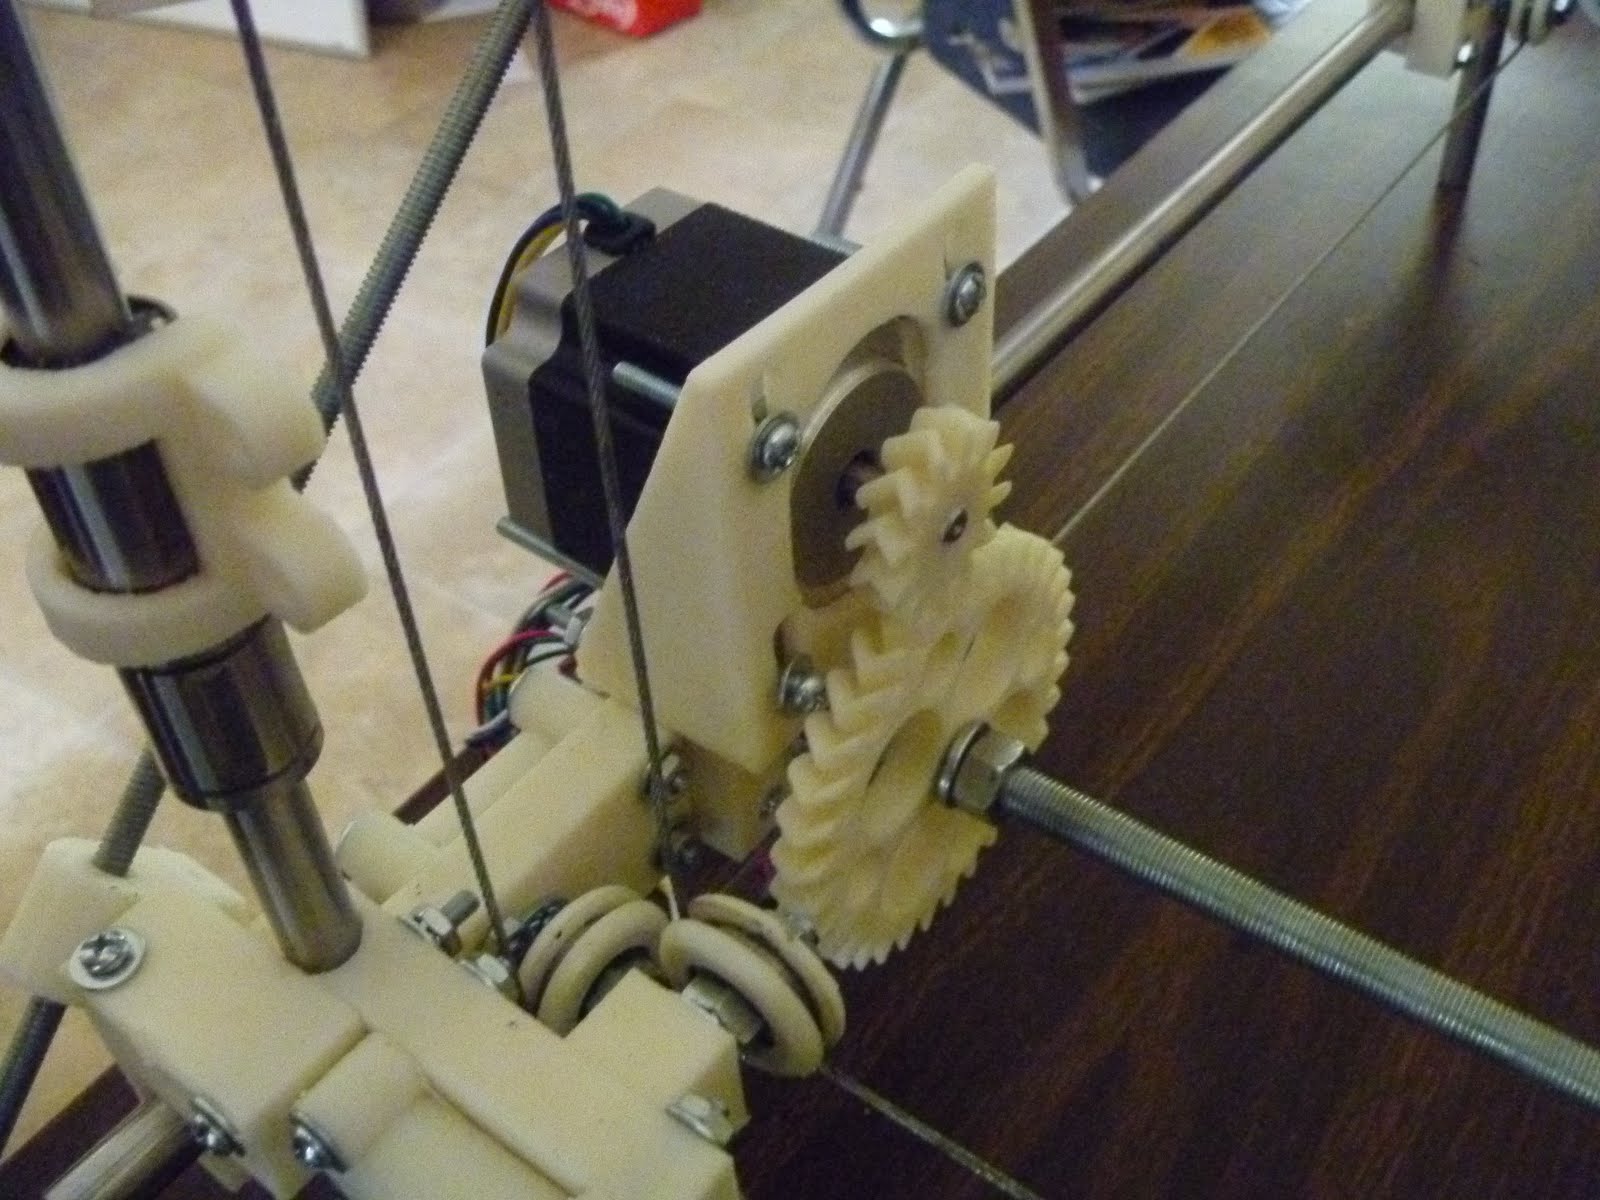
Now all that remains is for me to reprint the z-axis cable grippers and mount them and the z-axis will be complete.

Monday, May 30, 2011

Ready to install the print table


I got the last of the y-axis brackets printed and light mounted.


It looks like the print table with be 420x420 mm.  I've designed a bolt-on template that seats the table on the brackets and shows me where to site the guide holes for the mounting bolts.


And here is the first drill template mounted on a z-axis bracket.


Got it right on the second try!  :-)

Sunday, May 29, 2011

Stepping into firmware


Having had good experience with the Rapman's PIC32-based controller, I decided to stick with that MCU for my new printer.  As I mentioned earlier, rather than buy a $1k+ C compiler from Microchip, I bought a much less expensive, full-featured BASIC compiler for the PIC32 {they also offer C and Pascal compilers} and a full development board from Mikroelektronika in Belgrade.  Friday night, with the last of the z-axis brackets being printed on my Rapman and the 19 June exhibition in San Francisco coming up, I decided that I'd better get cracking on the firmware.

When I bought the PIC32 development board from Mikroelektronika, I also picked up a little stepper controller board from them.  


It uses an Allegro A3967 driver chip rated at .75 Amps.  Now ordinarily I wouldn't have considered getting such a thing, but in this case it seemed reasonable to have a ready made stepper tester board that I knew worked with my development board and I knew I had a number of small stepper motors that I could use with it.  Nothing I'd consider using on the printer, mind, but all the same useful in the learning process.

Like Darwin and Rapman, I'd decided to be conservative and use NEMA 23 steppers.  The price on these has dropped dramatically since we were building Darwins several years ago.  While shopping for NEMA 23 steppers, I happened across this little jewel.


Oddly enough, this 6 wire NEMA only drew 0.4 amps but produced a lot of torque.  I bought it, too, just so I could have have a NEMA the right size that I didn't necessarily want to use on the printer.  At that time I was looking at using the much heavier capacity Pololu stepper drivers that have recently proved so popular with Mendel electronics.


Now here is where serendipitous good fortune intruded.  The firm selling this stepper also had a special on 24 volt power supplies


When we began with Reprap about the only reasonably priced power supply we could lay hands on was a salvaged  5-12v ATX box out of old PCs.  24 volt supplies at the time were quite dear.  We knew very well that we could get a lot better performance out of steppers if we used 24 volts, but nobody wanted to invest in a 24 volt supply.  This bad boy put out 6.5 amps at 24 volts for $19.  The economics of that were hard to argue with given that my development board power conditioning circuit would eat anything up to 30 v DC.

Friday night and Saturday I spent the necessary hours skating down the learning curve of the Mikroelektronika development board and compiler IDE.  This took longer than it should have in that the PIC32 boards and compiler are very new to Mikroelektronika.  As a result, while they had code samples in BASIC for their stepper controller board, they were for 8 bit PIC chips and development boards, not their new 32 bit offerings.  I don't know why firms don't offer extremely simple sample code patches.  Instead, they always clutter it up with nonsense that runs LCD boards and makes LEDs flash on and off prettily.  Of course, how that works on an 8 bit board is very different than it is for a 32 bit board.

By Saturday afternoon, I'd managed to unclutter and migrate their code to PIC32 and had the stepper controller connected to the NEMA 23 working properly.


I knew there was a lot of friction in my cable z-axis system, so I did an initial gear design of 3.5:1 to insure that I got plenty of torque.  I had rigged the 6 wire stepper in series at Bogdan's suggestion so that the amperage pull was considerably below 0.4 amps.  Imagine my surprise when I discovered that there was ample torque even at half-step to happily push that stiff z-axis lead screw collar back and forth under serious load at 660 pps, a step rate just short of the resonance speed of the stepper.  Even under those loads the controller chip never got above about 50 C even after several hours under load.  That means that no heat sink is necessary.

When you translate that pulse rate out to an MXL belt driven x or y axis powered by an 18 groove pulley you get a calculated top speed of about 60 mm/sec.  That's about three times the head velocity that I print at.  It would appear that running a stepper with 24 volt power makes a very big performance difference.


Here you can see the stepper controller attached to the NEMA 23 and the PIC32 development board.


I've been thinking about that cool controller chip and that NEMA 23 and wondering about the possibility of driving a Wade extruder design with a NEMA 23.  The technology and economics are certainly attractive.

I'm going to buy some more of those controllers and also a relay card so that I can control the hot ends and heat lamps on the printer.


Mikroelektronika certainly has a very big toolbox of accessory boards that let you prototype just about anything without having to build up circuitry from scratch.  They're not as cheap as you could build from scratch, but if you count the time and cost of building up purpose made boards while you are developing a printer and not sure of everything you want in it, they're very cost effective.


Tuesday, May 24, 2011

Winding up the String Wars

I was finally able to finish making the connection between the z-axis lead screw and the cable turnbuckle for the z-axis positioning system. Given that the 3/8-24 threaded rod moves 0.945 mm per full turn and that the 32:12 gear reduction coupled with the 200 step/full turn for the NEMA 23 we get something like 533.33 steps per turn or 0.00177 mm movement per step.


You can see the general layout of the z-axis lead screw with this pic...


I've circled, from left to right, the thrust collar nut, the cable turnbuckle and the linear bearings that make up the elements to transfer power from the stepper motor to the cable.


Here you can see the three connected...


Here is a detail of one of the four cable-driven lifts for the print table with the bracket in place...


I plan on having one fixed joint between the brackets and the table and two sliding joints constrained in the x and y-axes in the two brackets adjacent to it and a sliding joint in the xy plane opposite.  I hope that will be stable enough.


Next, though, I have to see if I can finish the design and printing of the BfB hot end adapted Wade extruder derivative.  If that takes too long I will fall back on the two full BfB extruders that I have in stock.

Monday, May 23, 2011

NEMA 23 connected to the Z-axis lead screw


With the completion of the gear pair last night, the connection between the NEMA 23 and the Z-axis lead screw is complete.


That milestone meant that I had to move Sampo into the front room so that firmware development could begin.


Sunday, May 22, 2011

A Z-axis gear set for the Sampo 3D printer


Few experiences are more satisfying than a creating a useful device of great intrinsic beauty


Saturday, May 21, 2011

Another battle in the string wars: cabled z-axis working


It took me 10 hours and fifty minutes to print the first print table bracket and I got a few measurements wrong, but it appears that the cabled z-axis concept is going to work.


Since the speed of the z-axis is not particularly critical, I intend to use a fairly high gear ratio between the NEMA 23 stepper and the lead screw that drives the cabling to insure that I have adequate force to overcome friction in the system.

Sunday, May 15, 2011

Refighting the String Wars.


Back at the beginning of 2006, before there was even a Darwin, eD Sells at the University of Bath was designing Darwin's predecessor, ARNIE.  Confronting the problem of designing a z-axis, eD adapted the kinematics that were used on old wire cable parallel bars found on drafting tables.


eD adapted this technology in 3 dimensions to allow a single stepper motor to raise and lower ARNIE's print table.


Having trained as an architect before the Great Flood, I immediately fell in love the idea and adapted it to my failed Godzilla Repstrap design.


eD encountered no end of trouble with the cabling idea and eventually abandoned it for an approach which used four pieces of studding {threaded rod}.


It tends to be forgotten but the first fully operational Reprap machine at Bath was ARNIE, not Darwin.  Indeed, Bath's traditional whiskey shot glass, the second one printed after Vik Olliver's in New Zealand, was printed on ARNIE.  This approach was refined in Darwin.


Rapman, a Darwin derivative, was put into serial production by Bits from Bytes and is still selling quite well, today.


This z-axis approach does have its problems, though.  Studding is most definitely NOT a proper lead screw.  When you undertake to use four pieces of studding to raise a 3D printer's print table, the tendency of studding to be not quite straight plus the fact that you are using four pieces of not quite straight studding can lead to some unpleasant consequences.  Here is an extreme example of what can happen.


If you expand the pic, you can see a nasty juddering of layers taking place.  Here is a more usual example of the effect.


This is an extreme closeup with the light accentuating the effect.  The object is quite smooth to the touch.  The effect is still there, though.  Here is a more usual picture showing the effect.


If you expand the pic you can see a regular pulse peaking at every seventh layer.  This varies depending on how you adjust your machine and how straight your studding rods are.  The closer the alignment, the better your print quality.

Now Bits from Bytes set out to solve this problem in their out-of-the-box BfB 3000 printer.  They used a single proper lead screw to drive a cantilevered print table.


Both the Ultimaker and Makerbot's Thingomatic use the same approach.

Recently, when I decided to kaizen the old Darwin design,  I decided to see what I could do about the z-axis situation.  I didn't like the cantilevered print table approach and I did not want to simply duplicate the 4 studding solution originally used.  That got me to thinking about the old cabling approach that eD had used back in 2006.  The problem with it seemed to be applying force to the cable to move the print table.  eD tried to use a friction wheel and eventually gave it up.

It occurred to me that it might be reasonable to use a single studding lead screw to apply force to the cabling. Lead screws can apply LOTS of force.  So why not just attach one to the cable at a convenient point and be off?

I am in the process of doing just that.


I have circled the lead screw's thrust collar, the cabling turnbuckle and a linear bearing.  Those three elements will be connected and a NEMA 23 stepper used to drive the cabling to raise and lower the print table.


Here you can see a detail of the cabling scheme associated with a pair of linear bearings on a vertical shaft.  I have got to design a connector between the cable, the linear bearings and a corner of the print table.  Hopefully, this approach will let me get a smoother z-axis operation without the juddering so characteristic of the Darwin design.

Monday, May 09, 2011

Solid prints

Printing solid, structural objects is quite an art.  As I mentioned earlier, I am harking back to a very early effort that eD made with A.R.N.I.E, the precursor to Darwin.  eD wanted to use a cabling system for several of the axes not unlike what you used to see for parallel bars on traditional drafting tables.  eD finally gave up the effort when he couldn't get the cable to grip a sprocket wheel properly.  I have another idea about how to do that which I will talk about in the near future.


Securing the cable and pulleys for the z-axis is tricky.  I've spent quite a few days designing a lower corner mounting block for the pulleys.


At 69 cubic centimeters it's quite a large piece.  One thing you learn very quickly is that when you are designing structural pieces you have to remember that you not printing an isotropic material but rather a grained material not unlike wood.  As a result of this, it doesn't do to lay this block on one flat surface.  That gets you a part that is strong in one plane and fatally weak on the other.  Given it's size that's asking for corner curling in any case.


As a result, I decided to put the grain of the print at a 45 degree angle to both major planes.


Several tries at printing it finally got me settings that yielded a very clean, handsome print.  The preparation time for this piece was about 20 seconds after I removed it from the print table.


You can see how clean the bolt holes are.


As are the recessed pockets for the hex head 5/16ths inch bolts.  No warping.  No corner curling.  Pretty much a perfect print.  The longest dimension is 80 mm.


The part mounted properly without problems.