This blog is a lab notebook for my work with the Reprap open source 3D printing undertaking.
Saturday, August 07, 2010
Improving print roads calculations
In which your narrator rewrites the Slice and Dice routine that calculates print roads on a slice.
Having got a working finger design for my telepresence hand project, last weekend I set about to rig it to a servo motor to see what issues would come up. One of the items needed was a reel which screws onto the servo which takes up the tendons on the finger and moves them in concert.
The 40 mm reel looks like this...
I wanted to make the reel solid since it will be under considerable torque. To achieve that I used my concentric print roads option rather than cross hatching. I am not fond of cross-hatching mostly because the join between the perimeter of a print and the cross-hatching is so often mechanically poor. Using concentric print roads yields a much stronger print.
I calculated concentric roads very simply by painting a strip of pixels on the boundary of the slice to create an interior print road, deleting the strip to define the print road and then painting another strip inside of the new, smaller boundary. I repeated that simple process until I ran out of slice.
Heretofore, I'd used concentric prints for relatively shallow prints like this phalange...
This looks pretty good. I had been quite happy with the concentric roads routine till I applied it to the spool. The spool was a deep object, 40 mm in diameter with an interior and exterior boundary. You can see what happened...
The roads track the original boundary quite nicely till you get 6-8 roads away from the boundary. Then, geometric features of the original boundary are sufficiently magnified that the roads bear little resemblance to the shape of original boundary. The reel provides a really nasty example of this kind of distortion.
The reel that resulted was actually very strong, but looked nasty. Last night, I undertook to see if there was another way to do the job.
After several false starts, I discovered that if I began with the original slice boundary in one picture box and then mapped a filled circle of the proper radius onto each pixel in the boundary I got extremely smooth print roads. The reel slice you were first shown looked like this with the new routine...
You will notice that the interior and exterior boundary roads match each other very well but show a gap between the interior and exterior roads. The hole in this slice of the reel is a screwdriver access port for securing the reel to the servo drive shaft. The dimension in this slice is just big enough to pass the screwdriver tip. I widened that access port by two millimeters and the problem with the roads mismatch disappears as you can see here...
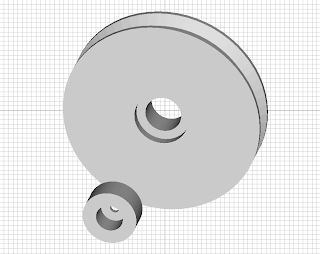
The reel consists of two parts; the reel itself and an insert which is glued into a recess in the reel which seats over the servo drive shaft and allows for a screw to secure it. You can see how this works in this exploded view of the ensemble...
As designed the print road pattern for the reel slice defining the recess for the insert looks like this.
If you look closely you will notice that the meet between inner and outer roads is a bit tight. The outer dimension of the insert is not critical and can be adjusted a bit to even that out. Care must be taken, however, to not compromise the roads in the insert in the adjustment.
The more experience I get printing dimension critical parts the more I understand what a balancing act getting the proportions is. When you are printing a critical part you can't just slap it together in CAD, pump out an STL and print it. The print road cross section is an integral part of your design and you have to exercise considerable cunning in making everything work together. This experience is much like what I learned after I graduated from architectural design studios eons ago. It's easy to design something that looks nice if you have any sense of aesthetics at all. Designing something that looks {or works} nice that can actually be built is a far harder task.
In any case, I've got the new print road mapping routine running rather well and am going back to work on my telepresence hand project.
Subscribe to:
Post Comments (Atom)


4 comments:
Excellent results! for round flat object i skip slicing and just use a script to generate custom g-code.
How about random interior shapes. I cant imagine how to solve that.
Random interior voids are not much of a problem. The only reason you see the examples of the reel are that that was what I was working on at that moment.
is there documentation describing the algorithms used to calculate the roads?
sounds like an algorithmic problem to me
It was.
Post a Comment