Back at the beginning of 2006, before there was even a Darwin, eD Sells at the University of Bath was designing Darwin's predecessor, ARNIE. Confronting the problem of designing a z-axis, eD adapted the kinematics that were used on old wire cable parallel bars found on drafting tables.

eD adapted this technology in 3 dimensions to allow a single stepper motor to raise and lower ARNIE's print table.

Having trained as an architect before the Great Flood, I immediately fell in love the idea and adapted it to my failed Godzilla Repstrap design.

eD encountered no end of trouble with the cabling idea and eventually abandoned it for an approach which used four pieces of studding {threaded rod}.
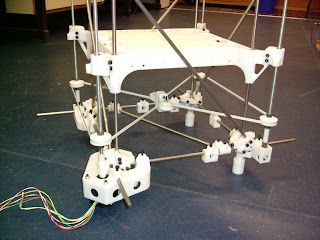
It tends to be forgotten but the first fully operational Reprap machine at Bath was ARNIE, not Darwin. Indeed, Bath's traditional whiskey shot glass, the second one printed after Vik Olliver's in New Zealand, was printed on ARNIE. This approach was refined in Darwin.

Rapman, a Darwin derivative, was put into serial production by Bits from Bytes and is still selling quite well, today.

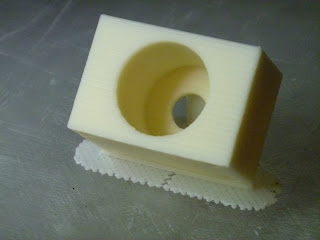
This z-axis approach does have its problems, though. Studding is most definitely NOT a proper lead screw. When you undertake to use four pieces of studding to raise a 3D printer's print table, the tendency of studding to be not quite straight plus the fact that you are using four pieces of not quite straight studding can lead to some unpleasant consequences. Here is an extreme example of what can happen.

If you expand the pic, you can see a nasty juddering of layers taking place. Here is a more usual example of the effect.

This is an extreme closeup with the light accentuating the effect. The object is quite smooth to the touch. The effect is still there, though. Here is a more usual picture showing the effect.
If you expand the pic you can see a regular pulse peaking at every seventh layer. This varies depending on how you adjust your machine and how straight your studding rods are. The closer the alignment, the better your print quality.
Now Bits from Bytes set out to solve this problem in their out-of-the-box BfB 3000 printer. They used a single proper lead screw to drive a cantilevered print table.

Both the Ultimaker and Makerbot's Thingomatic use the same approach.
Recently, when I decided to kaizen the old Darwin design, I decided to see what I could do about the z-axis situation. I didn't like the cantilevered print table approach and I did not want to simply duplicate the 4 studding solution originally used. That got me to thinking about the old cabling approach that eD had used back in 2006. The problem with it seemed to be applying force to the cable to move the print table. eD tried to use a friction wheel and eventually gave it up.
It occurred to me that it might be reasonable to use a single studding lead screw to apply force to the cabling. Lead screws can apply LOTS of force. So why not just attach one to the cable at a convenient point and be off?
I am in the process of doing just that.

I have circled the lead screw's thrust collar, the cabling turnbuckle and a linear bearing. Those three elements will be connected and a NEMA 23 stepper used to drive the cabling to raise and lower the print table.

Here you can see a detail of the cabling scheme associated with a pair of linear bearings on a vertical shaft. I have got to design a connector between the cable, the linear bearings and a corner of the print table. Hopefully, this approach will let me get a smoother z-axis operation without the juddering so characteristic of the Darwin design.

eD adapted this technology in 3 dimensions to allow a single stepper motor to raise and lower ARNIE's print table.

Having trained as an architect before the Great Flood, I immediately fell in love the idea and adapted it to my failed Godzilla Repstrap design.

eD encountered no end of trouble with the cabling idea and eventually abandoned it for an approach which used four pieces of studding {threaded rod}.

It tends to be forgotten but the first fully operational Reprap machine at Bath was ARNIE, not Darwin. Indeed, Bath's traditional whiskey shot glass, the second one printed after Vik Olliver's in New Zealand, was printed on ARNIE. This approach was refined in Darwin.

Rapman, a Darwin derivative, was put into serial production by Bits from Bytes and is still selling quite well, today.

This z-axis approach does have its problems, though. Studding is most definitely NOT a proper lead screw. When you undertake to use four pieces of studding to raise a 3D printer's print table, the tendency of studding to be not quite straight plus the fact that you are using four pieces of not quite straight studding can lead to some unpleasant consequences. Here is an extreme example of what can happen.

If you expand the pic, you can see a nasty juddering of layers taking place. Here is a more usual example of the effect.

This is an extreme closeup with the light accentuating the effect. The object is quite smooth to the touch. The effect is still there, though. Here is a more usual picture showing the effect.

If you expand the pic you can see a regular pulse peaking at every seventh layer. This varies depending on how you adjust your machine and how straight your studding rods are. The closer the alignment, the better your print quality.
Now Bits from Bytes set out to solve this problem in their out-of-the-box BfB 3000 printer. They used a single proper lead screw to drive a cantilevered print table.

Both the Ultimaker and Makerbot's Thingomatic use the same approach.
Recently, when I decided to kaizen the old Darwin design, I decided to see what I could do about the z-axis situation. I didn't like the cantilevered print table approach and I did not want to simply duplicate the 4 studding solution originally used. That got me to thinking about the old cabling approach that eD had used back in 2006. The problem with it seemed to be applying force to the cable to move the print table. eD tried to use a friction wheel and eventually gave it up.
It occurred to me that it might be reasonable to use a single studding lead screw to apply force to the cabling. Lead screws can apply LOTS of force. So why not just attach one to the cable at a convenient point and be off?
I am in the process of doing just that.

I have circled the lead screw's thrust collar, the cabling turnbuckle and a linear bearing. Those three elements will be connected and a NEMA 23 stepper used to drive the cabling to raise and lower the print table.

Here you can see a detail of the cabling scheme associated with a pair of linear bearings on a vertical shaft. I have got to design a connector between the cable, the linear bearings and a corner of the print table. Hopefully, this approach will let me get a smoother z-axis operation without the juddering so characteristic of the Darwin design.